
Safety Harness Inspection Checklist and Guidelines

Working at height needs the use of Safety Harness systems but one needs to be trained on their usage and inspection. Failure to check the Personal Protective Equipment or inability to use the safety harness effectively may prove disastrous during an emergency.
Always ensure safety harness guidelines are followed by the users and they always check the safety harness before using the same.
Below are all the important guidelines compiled in one place to help you understand the Safety requirements for Effective use and checking of Safety Harness.
Safety Harness Guidelines:
- Grasp the webbing with your hands and bend the webbing, checking both sides. This creates surface tension making damaged fibres or cuts easier to see. Webbing damage may not show up through a sight (visual) inspection only – manual (touch) the harness is equally important.
- Every harness must have a legible tag identifying the harness, model, and date of manufacture, name of manufacturer, limitations and warnings.
- Check tag for date of manufacture and remove from service if past adopted service life.
- If tagging system is missing or not legible remove harness from service.
- Wipe off all surface dirt with a sponge dampened in plain water. Squeeze the sponge dry. Dip the sponge in a mild solution of water and mild detergent. Work up a thick lather, with a vigorous back and forth motion. Then wipe dry with a clean cloth.
- Hang freely to dry, but away from excessive heat, steam or long periods of sunlight.
- Storage areas should be clean, dry and free of exposure to fumes, heat, direct ultra violet light, sunlight and corrosive elements.
- Do not store harnesses next to batteries, chemical attack can occur if battery leaks.
- Snap hooks should be of the self-locking type. Snap hooks are generally proof tested to 3,600 lbs. and have minimum tensile strength of 5,000 lbs.
Fail Criteria:
- Cuts, nicks or tears
- Broken fibers/cracks
- Overall deterioration
- Modifications by user
- Fraying/Abrasions
- Allowable 2%
- Discoloration of material
- Dependent on cause of discoloration
- Hard or shiny spots
- Indicates heat damage
- Webbing thickness uneven
- Indicates possible fall
- Pulled stitches
- Hard or shiny spots
- Missing Straps
- Undue Stretching
- Indicates possible fall
- Burnt, charred or melted fibers
- Indicates heat damage
- Stitching that is missing
- Excessive hardness or brittleness
- Indicates heat or UV damage
SAFETY HARNESS INSPECTION:

- Webbing—Grasp the webbing with your hands 6 inches to 8 inches apart. Bend the webbing in an inverted “U”. The surface tension resulting makes damaged fibers or cuts easier to detect. Follow this procedure for the entire length of the webbing, inspecting both sides of each strap. Look for frayed edges, broken fibers, pulled stitches, cuts, burns, and chemical damage.
- D-Rings—Check D-rings for distortion, cracks, breaks, and rough or sharp edges. The D-ring should pivot freely.
- Attachment of Buckles—Inspect for any unusual wear, frayed or cut fibers, or broken stitching of the buckle or D-ring attachments.
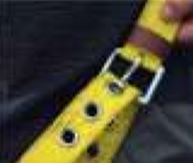
- Tongue/Grommets— The tongue receives heavy wear from repeated buckling and unbuckling. Inspect for loose, distorted or broken grommets. Webbing should not have additional holes punched.
- Tongue Buckles—Buckle tongues should be free of distortion in shape and motion. They should overlap the buckle frame and move freely back and forth in their socket. Roller should turn freely on the frame. Check for distortion or sharp edges.
- Friction and Mating Buckles— Inspect the buckle for distortion. The outer bars and center bars must be straight. Pay special attention to corners and attachment point at the center bar.
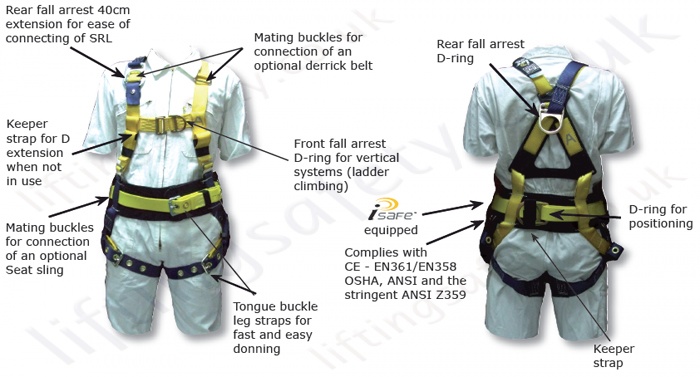
Figure 1 : https://www.liftingsafety.co.uk/product/delta-2-derrick-harness-2732.html
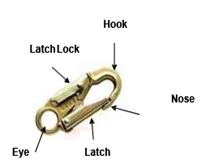
- Hardware — Snaps: Inspect closely for hook and eye distortions, cracks, corrosion, or pitted surfaces. The keeper (latch) should seat into the nose without binding and should not be distorted or obstructed. The keeper spring should exert sufficient force to firmly close the keeper. Keeper locks must prevent the keeper from opening when the keeper closes.
- Web Lanyard — While bending webbing over a pipe, observe each side of the webbed lanyard. This will reveal any cuts or breaks. Swelling, discoloration, cracks and charring are obvious signs of chemical or heat damage. Observe closely for any breaks in stitching.
- Shock Absorber Pack—The outer portion of the pack should be examined for burn holes and tears. Stitching on areas where the pack is sewn to D- rings. Belts, or lanyards should be examined for loose strands, rips, and deterioration.
- Shock-Absorbing Lanyard—Shock absorbing lanyards should be examined as a web lanyard. However, also look for the warning flag or signs of deployment. If the flag has been activated, remove this shock-absorbing lanyard from service.
- Rope Lanyard—Rotation of the rope lanyard while inspecting from end-to-end for any fuzzy, worn, broken or cut fibers. Weakened areas from extreme loads will appear as a noticeable change in original diameter. The rope diameter should be uniform throughout, following a short break-in period.

Figure 2 http://cablecraftltd.com/products/fall-arrest/

Steps to take when attaching a body harness:
- Hold the harness by the D-ring and shake to allow all straps to fall in place.
- Slip the straps over shoulders so the D-ring is located in middle of the back between shoulder blades.
- Pull the leg strap between legs, connect to the opposite end, and repeat with the second leg strap.
- For belted harnesses, connect the waist strap after the leg straps (the waist strap should be tight but not binding).
- Connect the chest strap and position in the mid-chest area and tighten to keep the shoulder straps taut.
- After all straps have been buckled, tighten all buckles so the harness fits snugly but allows full range of movement.
- Pass the excess strap through loop keepers.
Friction Buckle

- Pass webbing under the buckle, over knurled bar, and back down between knurled bar and frame.
- Pull web end to tighten.
Mating Buckle

- Pull the center bar buckle completely through the square link.
- Allow the center bar buckle to fall into place on top of the square link.
- Pull the loose end of the strap to tighten the adjustment of the harness.
- Slide keepers to hold any excess webbing.
Tongue Buckle
- Insert the loose strap of webbing through the tongue buckle, placing the buckle tongue through the appropriate grommet.
- Push remaining webbing through the keeper to retain the loose end.
A supervisor monitors harness use to ensure:
- Full body harnesses are worn and only sternal (front) and dorsal (back) attachment D-rings are used for fall arrest connection
- All connecting lines, lanyards and fall arrest devices restrict free fall distances to a maximum of 2m and incorporate some type of energy absorber
- All anchorages have a load bearing capability of 15 kn (1 person)
- Workers do not attach to anchors at their feet
- No more than two workers connect to an anchor (21 kn required)
- That fall arrest systems are not employed at heights with insufficient fall clearance, i.e. a 2m lanyard with shock absorber will require the anchor to be between 5.1 and 5.7 m from the level below.
- Safety harness systems are not used in work environments that may adversely affect equipment.
- All harness system equipment is in good condition and stored correctly when not in use.
Calculating Free Fall Distance and Total Fall Distance
OSHA requires that potential free fall distances will never exceed 6 feet (1.8 m) when using personal fall protection. So, careful consideration must be given to the way that a fall arrest system is selected and rigged so that a 6 foot fall distance is not exceeded. A qualified person must select the components, materials, anchorage and anchorage connectors to match the system application, the work, workplace hazards, and the environment.
You should always follow the manufacturer’s recommendations when connecting harnesses, lanyards, or retractables so that deceleration distance and elongation are accounted for.
Total fall distance is the total distance of a free fall, plus the additional distance encountered during deceleration. When calculating total fall distance for a worker who is working at height, all of the following factors must be considered:
Length of Lanyard / Self-Retracting Lifeline – The actual measured length of the lanyard or retractable device that the worker uses to connect their harness to an anchorage point.
- Deceleration / Free Fall Distance – OSHA’s maximum allowable deceleration distance is 3.5 feet which accounts for dynamic elongation of the energy absorber.
- Height of Worker – The worker’s height is another critical factor that must be accounted for to consider the total fall distance.
- Distance from the Worker’s Feet to the Harness D-Ring – Accounts for how much the harness will stretch when supporting the worker.
- Safety Factor – Allow for an additional safety factor of 3 feet (1 m) below a fallen worker’s feet.
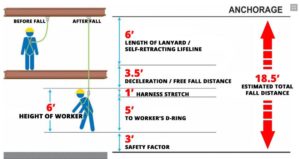
If we run through a scenario shown in the graphic above and use the following factors, we can determine if there is sufficient fall clearance:
- Length of Lanyard / Self-Retracting Lifeline – 6 foot lanyard
- Deceleration Distance – 3.5 foot free fall
- Harness Stretch – 1 foot of harness stretch
- Height of Worker – 6 feet
- Distance from Worker’s Feet to D-Ring – 5 feet
- Safety Factor – 3 feet
You can download the safety checklists in below links to check the Safety harnesses that you use.